 Pin It
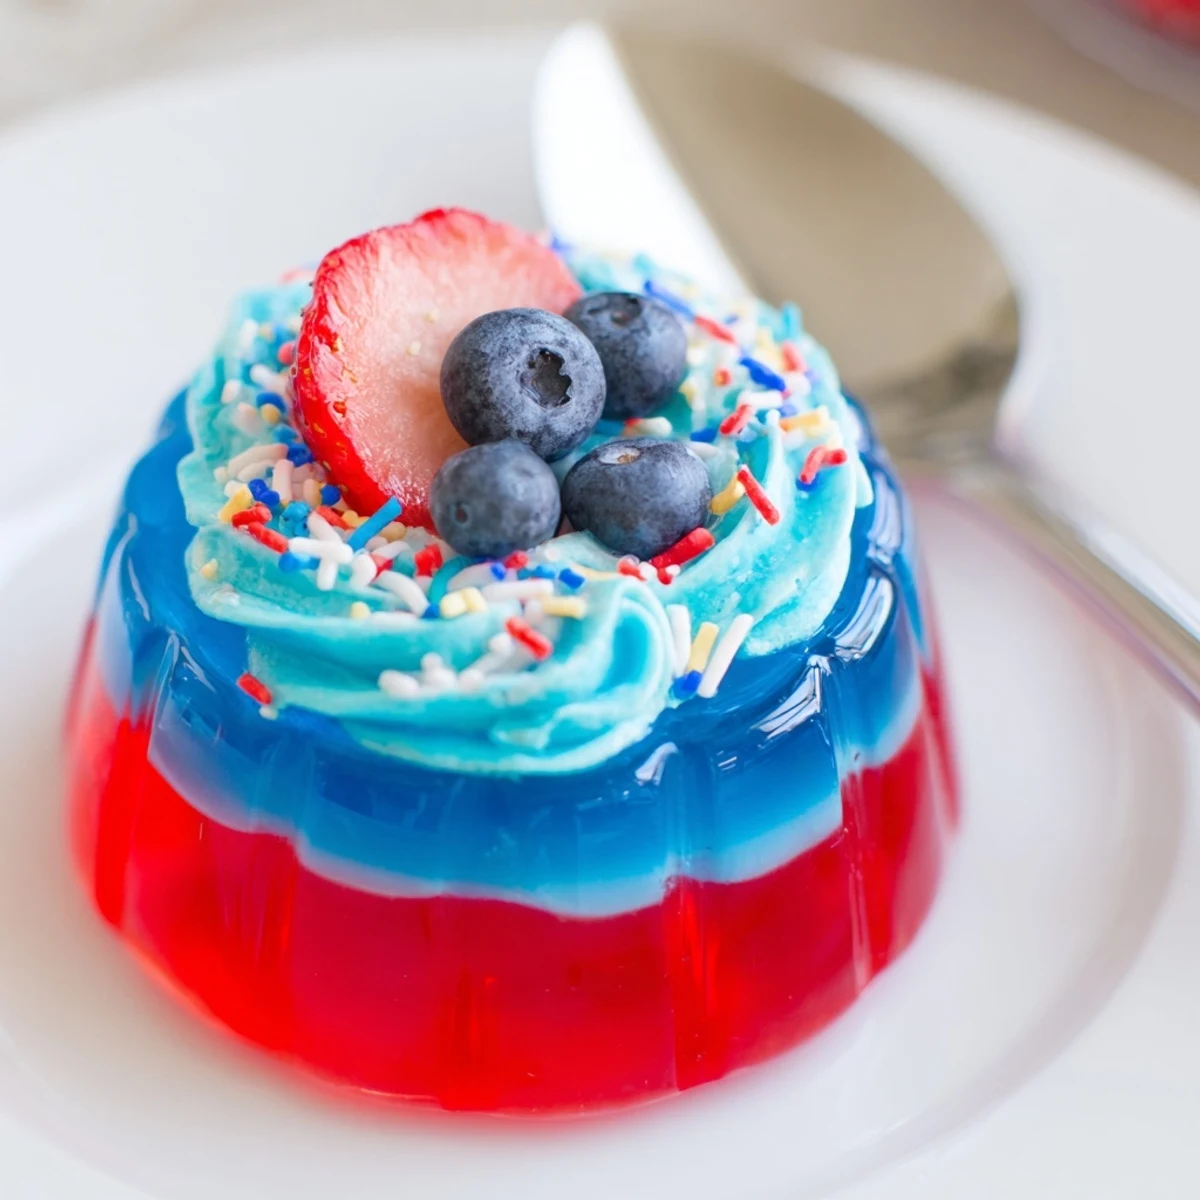
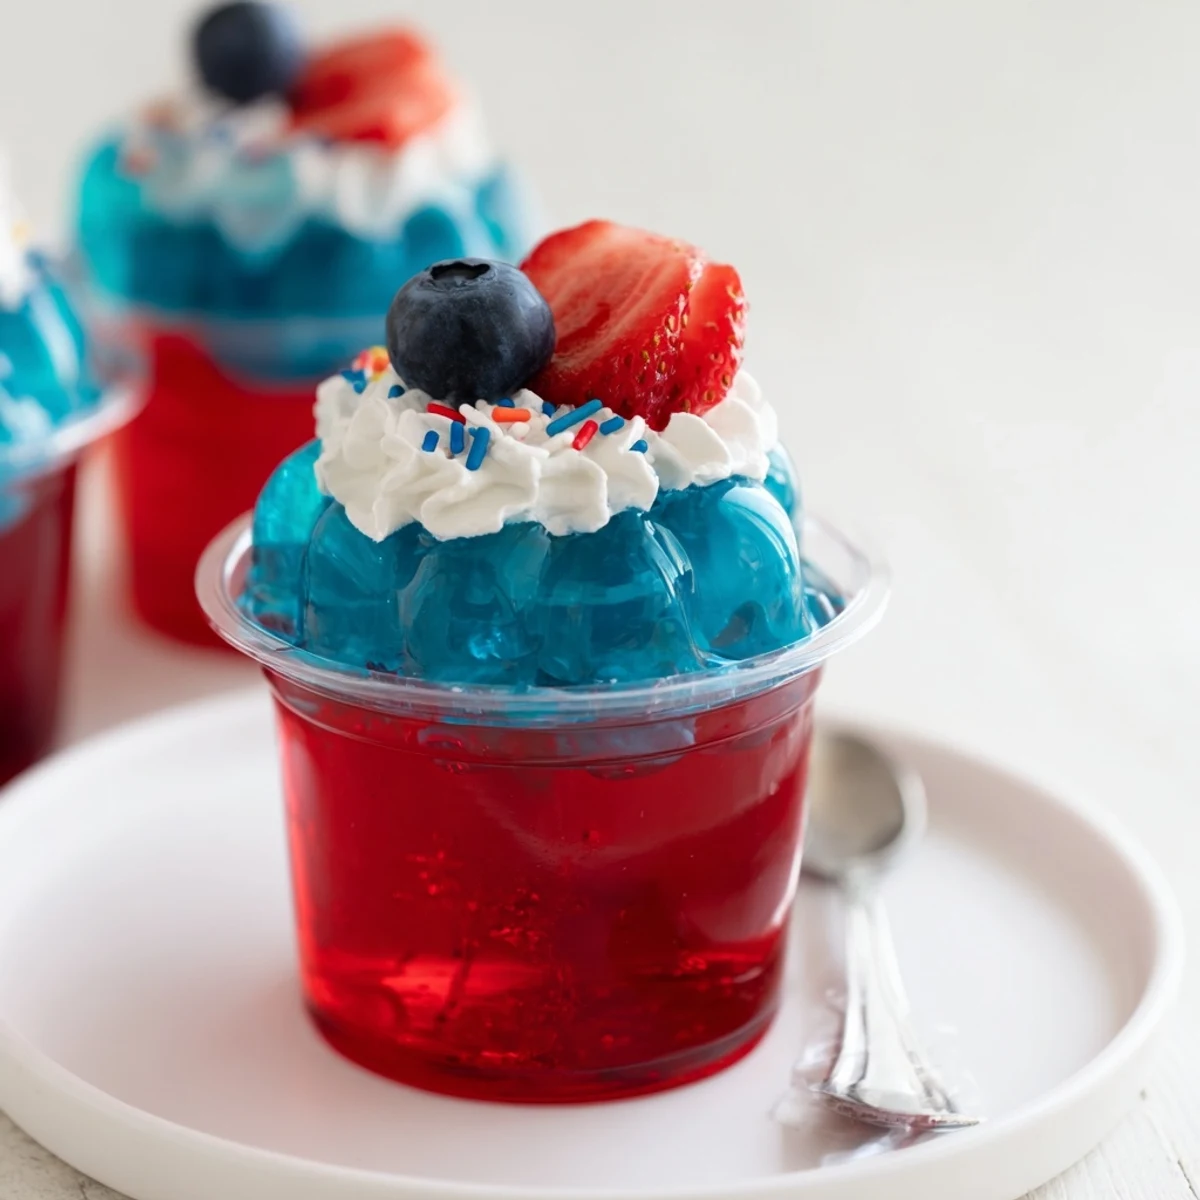
 These red, white and blue jello cups stack strawberry and berry-blue gelatin around a smooth instant vanilla pudding layer for a striking patriotic treat. Dissolve the gelatin in boiling water, add cold water, and set each colored layer in clear cups. Spoon the whipped pudding between layers, chill until fully set (about 2–4 hours), then garnish with whipped topping and fresh berries. Serves 8; can be made dairy-free with plant milk and non-dairy whipped topping.
That unmistakable sound of a spoon tapping against the edge of a glass cup always reminds me of summer get-togethers, when someone would inevitably unveil a tray of these Red White and Blue Jello Cups from the fridge. There’s something delightfully mischievous about sneaking an extra layer of whipped topping beneath the berries, hoping no one catches you. On a hot day, the chilled layers seem to sparkle under the kitchen lights, almost too pretty to eat but never lasting long once the first cup is claimed. Making these patriotic treats has become a playful summer tradition—less about perfection, and more about the pure joy of dessert.
I can still hear my neighbor’s laughter echoing as we tried to guess which kid would end up with blue lips from diving right into the final layer. These jello cups always attracted a small crowd of little hands and big grins, especially when we’d let everyone pick their own toppings. One year, someone topped them with whole strawberries and toothpick flags, adding just the right touch for a Fourth of July picnic. No matter the crowd, these always disappear faster than you’d expect.
Ingredients
- Strawberry or Cherry Gelatin: The deep red layer sets the theme and sweet berry flavor—chill well to avoid mixing colors.
- Boiling Water: Dissolves the gelatin completely; I always wait for visible steam before pouring.
- Cold Water: Helps cool the mixture just enough so it’s safe to pour into cups.
- Instant Vanilla Pudding Mix: Creamy and quick—just whisk, no stovetop needed.
- Cold Milk: The pudding’s secret to thickening nicely; use very cold milk for best results.
- Whipped Topping: Folds into the pudding for a cloud-like white layer; save a little extra for dramatic swirls on top.
- Berry Blue Gelatin: That vibrant blue never fails to impress—stir thoroughly for clarity.
- Fresh Berries (Optional): Adds a juicy burst and a festive finish; pat them dry to prevent slipping.
- Sprinkles (Optional): For extra sparkle and squeals of delight—let the kids sprinkle their own.
Instructions
- Build Your Base:
- Sprinkle the red gelatin into a bowl, pour in boiling water, and stir until everything disappears into brilliant ruby brightness. Add cold water to cool, then divide evenly among your clear cups—watch the steam rise and admire the gleam before refrigerating for an hour until gently set.
- Mix the Middle:
- Whisk the pudding mix and cold milk in a fresh bowl, feeling it thicken beneath your wrist, then fold in the creamy whipped topping until it’s pillowy. Dollop this dreamy layer gently onto the set red, smoothing it out in a soft layer—back into the fridge for a half hour so it holds its own.
- Top Things Off:
- In a clean bowl, dissolve blue gelatin with boiling water, letting the vibrant color develop before cooling with cold water. Very carefully spoon or pour this striking blue atop the chilled white—slowly, so it creates its clean line—then refrigerate for a few more hours so all layers become set and vivid.
- Garnish Like You Mean It:
- Just before serving, crown each cup with swoops of whipped topping, a handful of berries, and a playful scattering of sprinkles. Watch faces light up as you deliver each one, and listen for happy clinks of spoons hitting bottom.
 Pin It
 The first time a dessert tray of these showed up at my aunt’s block party, even the ‘serious’ adults abandoned their cobblers for something fun and cool. That was the moment I realized dessert could spark the most spontaneous kitchen dance parties—red lips, blue tongues, and all. There’s a tiny thrill in making something that people talk and laugh about long after the last spoonful is gone.
How to Get Clean Layers Every Time
Chilling each layer until fully set is the trick that makes lines sharp and defined—it’s tempting to speed it up, but give each color its moment. If the cups tilt or get bumped before a layer is ready, some swirls and wobbles will appear (which can still look pretty whimsical, honestly). For super crisp layers, I place all the cups on a tray, so I can move them into the fridge together without disturbing things.
Ways to Make It Your Own
Switch out the flavors to suit the party or your favorite colors—lime and orange for a tropical vibe, or grape for a deep purple burst. Adding different berries or chopped fruit in between layers creates surprises as you dig in. Going dairy-free is easy: there are plenty of plant-based pudding mixes and whipped toppings, and the layers still set beautifully.
Serving, Storing, and Party Tricks
Assemble these cups a day ahead for easy entertaining; just cover them so the top stays fresh. I love using clear plastic cups, especially for outdoor gatherings—no worries about breakage, and everyone can see the layers. If someone insists on more sprinkles, just hand over the jar and watch the creativity spark—it’s half the fun.
- Layer while each mixture is just warm, not hot.
- Pat any berries dry before adding.
- Keep chilled until serving so layers stay perfect.
 Pin It
 Every time I make these, I’m reminded that sometimes the most joyful food is also the simplest. Here’s to bright colors, easy laughter, and living that party spirit—one spoonful at a time.
Recipe FAQs
- → How long should each layer chill before adding the next?
-
Chill the red and blue gelatin layers at least 1 hour each until just firm. The white pudding layer needs about 30 minutes to set enough to support the next gelatin layer. Slightly firm layers prevent mixing when you add the next color.
- → How can I prevent the layers from bleeding into each other?
-
Allow each layer to reach a light but firm set before adding the next. Pour or spoon the next layer slowly over the back of a spoon and avoid a heavy stream. Cooling the cups on a flat surface and chilling between additions helps maintain distinct layers.
- → Can I make these ahead of time and how should I store them?
-
You can assemble up to 1 day ahead. Cover the cups with plastic wrap and refrigerate. For best texture and garnish appearance, add whipped topping and fresh berries just before serving.
- → What are good substitutions for dairy to make these dairy-free?
-
Use plant-based milk in place of cow's milk and a dairy-free instant vanilla pudding mix. Replace whipped topping with a non-dairy whipped alternative. Check labels to ensure gelatin and pudding ingredients meet your dietary needs.
- → Any tips for achieving the clearest, most vibrant layers?
-
Use clear serving cups for the best visual impact and prepare gelatin with the exact water amounts. Avoid over-stirring once the gelatin begins to thicken, and chill on a level surface. Fresh, brightly colored gelatin flavors yield the most vivid layers.
- → How many servings do these cups yield and what tools are helpful?
-
This version yields about 8 small cups. Useful tools include measuring cups, mixing bowls, a whisk, a spoon or ladle for gentle pouring, and small clear serving cups to showcase the layers.